Anyone paying attention to the SweetKM social media team (and by team I mean me) will know that I am a panelist for the Liesl + Co. Gallery Tunic Sew-Along over on the Oliver + S blog. The sew along portion started Monday. I couldn't contain my enthusiasm and raced on ahead. You can read my pregame post on the Oliver + S blog to catch yourself up. Go ahead, we'll wait.
You can purchase the digital pattern here. If you're normally annoyed by digital patterns because they are a huge waste of printer paper, this would be a good time to restore your faith in the digital format. The Oliver + S family of patterns make particularly efficient use of paper, using parts of sheets rather than just full sheets (when you print you'll see what I mean). If you're committed to to a professionally printed pattern, you can purchase that here.
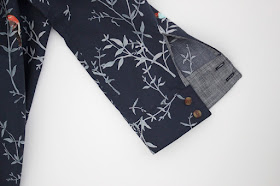
Let's start with fabric. I used the Woodland Collection designed by Liesl Gibson. It's printed on Robert Kaufmann Cambridge Lawn, so I already knew what the fabric would be like before I bought it. The print I chose is In The Trees Charcoal. I would call the background navy not charcoal, not a deal breaker just a heads up. I had planned to use this Robert Kaufman Manchester in Mist (shown above) as the accent on the inside. In the end I didn't because it was the tiniest bit heavier than the lawn and I didn't want it to interrupt the flow of the main fabric. But I'm excited about the Manchester fabric, it would be a great supplement to my chambray heavy wardrobe. It's a nice weight for garments, comes in a lot of colors, and has a nice subtle texture to the color and the weave just like chambray. Wish I bought more.
Now to my shirt. I had planned to make a collared, long sleeved, tunic (as opposed to a banded, 3/4 sleeve, dress. Lots of options in this pattern). Actually I made two tunics, the first one out of a rather stiff cotton shirting. I promise you I made that one as specified. The thing is, I can't be satisfied following instructions for long, and certainly not twice in a row, so I deviated a bit from my original plan with my final tunic.
First, and most obviously, I made it a button down shirt. From the muslin I realized the extra volume of the pleat under the neck opening was a bit much for me, and eliminating it didn't effect the fit at the hips. So I extended the placket facing the entire length of the shirt, and cut the front pieces as two rather than on the fold. Then sewed the altered placket to the front opening, turned it to the wrong side, made a line of stitching 1" from the open edge to tack it down, and added buttons and button holes.
Second, I cut the cuff as two pieces. I knew I would mostly wear the sleeves rolled up, and I thought it would be nice to have a contrasting fabric to break up all the print. The outside cuff matches the body fabric, and the inside is chambray. I used Robert Kaufman Union Light for the accent, because it is feather weight and goes with everything. Get some, and keep it on hand, you just never know.
Third, and barely worth mentioning, I cut 1" off of the front hem, and shaved about 1/2" inch more off of the rounded front shirt tail. This way when I wear it with skinny jeans I'm showing maximum leg to lengthen my silhouette (I hope).
As for that lonely hank of yarn, my little cardigan project is making slow progress, as knitting is prone to do. It's sort of a tortoise and hare situation. The tunic is the hare, and is about to go take a nap until the pokey tortoise crosses the finish line. Until then, I'm satisfying the color combination with some suede boots.
***
DETAILS
Tunic Pattern: Gallery Tunic/Dress from Liesl + Co.
Tunic Fabric: In the Trees Charcoal from Hawthorne Threads
Tunic Accent Fabric: Chambray Union Light from Robert Kaufman
Skirt: Self Drafted Mini
***
Follow SweetKM


What a great pattern hack! I love the addition of the button-down element, and I adore your fabric combination!
ReplyDeleteThanks Meg! Your dress version makes me want to make another in a flowy fabric!
DeleteIt's really nice. I like the fabrics you chose and your mods are great. The volume below the pleat is what has given me pause (and lack of darts - but I read somewhere recently that there are optional darts included?) in buying this pattern - I am also not sure how well it would work on fuller busts and I haven't seen it on many shapes that look like mine. But it's good to know that eliminating the pleat doesn't actually affect hip fit (unless, I guess, you're really pear shaped which I am not). Hmm.
ReplyDeleteThe pattern includes instructions for a full bust adjustment with a dart. I was anti-pleat, but I just saw a very similar top at Anthropologie with the pleat. Now I'm second guessing my pleat prejudice! I think the key is a drapey fabric.
DeleteOh, pretty! Love how you changed up the pattern and love that fabric too.
ReplyDeleteThanks Kristin!
DeleteLovely alterations! Gotta make it work I say. Love the contrast cuffs.
ReplyDeleteThanks Sarah! I can't resist tinkering with a pattern.
DeleteThis is stunning! I literally said 'wow' as I was looking at the photos! You have the best taste!
ReplyDeleteThanks Rachel!
DeleteI have been excited to see your final make ever since I saw your fabric selection. This is great -- love both your modifications (very inspiring for future gallery tunics) and the fabric.
ReplyDeleteThanks Cate! I can't help but tinker with patterns, but I like it as written too. :)
Delete