Showing posts with label bags. Show all posts

Sunday, December 4, 2022

How to add a decorative tag to the Wholecloth Project Bag

Adding a decorative tag to the Wholecloth Project Bag is a fun embellishment and a great way to identify bags made from the same fabric. I made this set of Project Bags as reusable Christmas wrap. They're an easy way to wrap bottles of wine, sweatshirts, and pajamas, or a fitting presentation for hand knits. You can add these to your easily add these tags in a few simple steps. I've whipped up a quick tutorial, you'll find it below. 

The following is a tutorial for the tag embellishment, and is meant to be used with the Wholecloth Project Bag sewing pattern. 

Instructions. Prepare your Wholecloth Project Bag pattern piece as described in the pattern instructions. 


Prepare the tag. Cut a rectangle of fabric that is 3" x 2 1/4". Press a 3/4" fold into each short side of the rectangle, so that wrong sides are touching (left diagram). Press. Fold in half perpendicular to the previous folds, so that the edges of the previous folds are hidden (right diagram). Align edges, press.

Attach the tag. Position the prepared tag 1 1/2" from the upper right notch, as shown.  Align the open edge of the tag with the raw edge of the main fabric piece. Pin in place. Assemble the Project Bag beginning at step 1 of the Wholecloth Project Bag pattern instructions. 

A few notes on how to handle the tag during bag construction:

Step 8 - press the tag seam allowance toward the bottom of the bag on the wrong side of the bag, and press the portion of the tag on the right side toward the bag opening. 

Step 10 - Trim the tag seam allowance  with the lowers seam allowance in Step 10. Complete the bag as instructed. 

Step 14 - be sure the flap of the tag on the right side held clear of the topstitching.

Share your project.

#wholeclothprojectbag

@_wholecloth


***

Follow Wholecloth Patterns

Etsy: Wholecloth Patterns

Youtube: Wholecloth Patterns

Instagram: @_wholecloth #wholeclothpatterns

Newsletter: Join here

TikTok: @_wholecloth 

Saturday, December 3, 2022

Fall Celebration Outfit

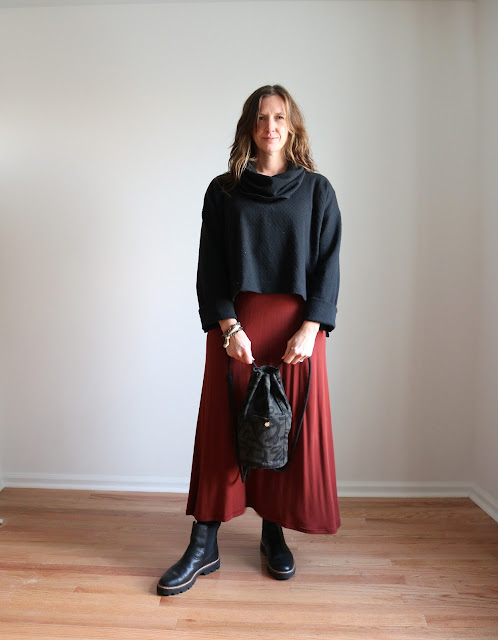
I'm tempted to call this post "an outfit to go with my bag" because that's exactly how it came about. As I immerse myself in bag sewing I try to keep the big picture in mind. The big picture, of course, being the one that goes on Instagram. And, in that big picture my bag isn't just hanging on a hook (although I like that picture too), but it goes with a great handmade outfit. So, here we have a Mini Wholecloth Logan Bag to go with my outfit.


Bag Details:
Of course, you can find the Wholecloth Logan Bag sewing pattern in the Wholecloth Patterns shop. It's a drawstring bucket backpack with a front snap pocket, and an inner zip pocket that comes in two sizes. This is the mini. The fabric is Cotton + Steel In Bloom On The Way canvas in Night. I love the black on gray abstract print, as you may have noticed from the matching Tether Pouches in the background. (Tether pattern is in the shop, just sayin'.)

Outfit Details (sort of):
I'm not going to rehash the specs of old makes here. As someone who has been sewing my own wardrobe for years I'm always looking for ways to make new outfits out of old clothes. Here we have two older pieces, a Sallie Dress from Closet Core Patterns, and a cowl neck sweater from a self-drafted pattern you've seen plenty of here. I rarely wear these pieces. The dress is a bit low cut for my taste. I made it in a hurry (in 2016!) and neglected to confirm that the deep V was within my comfort zone. I'm making it work for the pictures, but it doesn't really work for me in real life. I've morned the unwearability of this dress for years (six of them!!). The rayon jersey knit fabric has such nice drape and movement, that I really want to wear it all summer long. There in lies the problem. I had this flawed dress firmly in the warm weather category, when I really just needed to reframe it as a cold weather dress. Easy.

This fall when I opened up my closet a flash of rust caught my eye (probably as it was falling off the hanger) and my mind leapt to pumpkin spice, crunchy leaves, and my mother's birthday party.  I could have this delightful skirt swishing around my stockinged legs all winter long with the right layers. 

Enter the self-drafted sweater. I made this in a hurry (no blog post or photo evidence, but in 2019) when I needed a black top. The fabric was a bit flimsy for the outfit I had in mind, so I never (really, never!) wore it. Somehow these two imperfect pieces work perfectly together, and have been worn more in the last two months, than in all their other years combined. 
I'm not sure there is a moral to this story. By all means, purge your closets. I tend to hang on to all clothing, especially things I've made. Maybe I should have moved these pieces on long ago. I'm pretty pleased to have them now, because they go so nicely with my bag. 

Thursday, November 18, 2021

Sewing Tutorial: How-to Sew a Quilt Block Front Panel for the Logan Bag

My intention with the simplicity of the Logan Bag sewing pattern design is that it is easy to customize. I have too many pattern hacks and custom fabrics in mind for one woman, but this one made it to the top of my to-do list. The rectangular front pocket panel is just asking to be chopped up and put back together with pretty scraps. I'm not much of a quilter (yet?!), but I thought I'd share my process and the template to make your own quilted Logan Bag. There are templates for both the Mini and Standard sizes. The one I'm showing here is Standard, it's just the right size for bigger knitting projects, and I have a sweater on my list for winter knitting. 
I made a few test quilt blocks with scrap fabric before settling on the final fabric. I used a denim from my stash that is dark on the right side, and light on the wrong side. I used the wrong side to make the contrasting lighter pieces. I made a sandwich of the denim, a single layer of cotton quilt batting for a little loft, and fusible interfacing for structure. The whole bag is quilted with simple lines 1" apart. After making the quilted additions to the exterior I just sewed the pattern as written. It's a simple way to customize the Logan Bag. You will need the full Logan Bag pattern to do this pattern hack. Tutorial instructions are in a handy pdf you can store with your Logan Bag pattern. 

The quilted pocket design is a play on the classic flying geese quilt block, and inspired by the stacked triangle texture of the Fragment Scarf. It brings making full circle to carry knitting in a homemade bag inspired by knitting! 

I've made up a few more Hardware & Supply kits for Christmas giving. To sweeten your holiday making, I'm offering free US shipping on the Hardware & Supply Kit while the current inventory lasts. The pattern and kit would be a lovely holiday gift for your sewing bestie, or sew one up for a knitting friend.
Get the tutorial here:
Get the full pattern here:
Get the kit here:
Consider this your quilted Logan Bag starting point. Let the creativity flow. As always, I would love to see where this pattern takes you. Share your finished bags using the hashtags #wholeclothloganbag & #wholeclothpatterns. Be sure to tag me @_wholecloth.


Wednesday, September 29, 2021

Bag Making: Logan Bag Hardware & Supply Kit

The Logan Bag drawstring bucket backpack has quite the list of hardware and supplies. There is a snap front pocket,  zippered interior pocket, and eyelets along the opening. It's got a drawstring closure, and optional self made piping around the bottom. Heavy duty fusible stabilizer helps keep the shape of the base. I chose components that are easily sourced from craft shops and online suppliers, but you might not be able to find everything at one store. To make sewing your Logan Bag even easier, I've assembled a kit for one stop Logan Bag hardware and supply shopping. The components were selected with ease of installation and professional finish in mind. 

Wholecloth Patterns Logan Bag drawstring bucket backpack sewing pattern

Standard Contents: 
2 heavy duty snaps (1 extra for practice)
1 snap tool
7” zipper
10 extra large eyelets 
1 eyelet tool
10” square of stabilizer
⅜” drawstring  
01 Piping Filler Cord

Wholecloth Patterns Logan bag drawstring bucket backpack sewing pattern
Mini Contents: 
2 heavy duty snaps (1 extra for practice)
1 snap tool
5” zipper
12 large  eyelets (2 extra for practice)
1 eyelet tool
6” square of stabilizer
1/4” drawstring 
00 Piping Filler Cord


The specialty tools needed to install the snaps and eyelets are included in the kit. A few common household and sewing tools are also necessary. You will need to have a hammer to install the hardware, x-acto knife to make the eyelet openings, a cutting mat or wood block to cut and hammer on, tailor's chalk for marking the placement of the hardware, a piping foot or zipper foot to make your own piping, and a heavy duty needle (such as 110/18 or 100/16) to make sewing through many layers of heavy duty fabric possible. It's also nice, but not mandatory, to have clips for holding thick fabrics together that might be difficult with pins. 

Get yours now!


Don't forget the discount!
The Logan Bag sewing pattern is 15% off until Friday, October 1st. Use the code LOGAN15 at checkout to get the launch week discount!

Get yours now!


Saturday, September 25, 2021

Bag Making: Introducing the Logan Bag Sewing Pattern


The new
sewing pattern is now available in the shop!

The Logan Bag

The Wholecloth Logan Bag is a drawstring bucket backpack. It has an easy access snap pocket at the front and a secure zipper pocket on the inside. There is a drawstring closure. The bag can be worn in many ways from backpack to cross body. The pattern come with two sizes of bag. The Standard size is designed to hold everything you need for a day out and about. The Mini will hold all the essentials like your wallet, phone and keys. 

The sewing pattern comes with 2 sizes of print at home PDF pattern, and clear step by step illustrated instructions for creating your bag. This pattern is written for heavy weight fabrics. We recommend 10 oz. canvas or similar. Lighter fabric can be used with the addition of medium weight interfacing. 

The pattern includes:
- step by step illustrated instructions
- print at home and assemble pdf pattern pieces 
- dimensions to draft your own pattern pieces 
- pattern and instruction to sew 2 different sizes of Wholecloth Logan bag.

Finished Bag Dimensions:
Standard: 10"x20"
Mini: 6"x12"

I've been working on this pattern little by little for most of the year. The benefit of the extended time in pattern development is that I've been road testing my bag for months. I love the hands-free convenience of wearing a backpack, and the reach-in accessibility of the drawstring top. It's a great everyday style. 

The bags shown here are made with 10oz cotton canvas. I didn't prewash it to maintain the stiffness of the new fabric. The rigid fabric, and a reinforced base, allow the bag to stand up for easy access, or working as a portable knitting basket. Lighter fabrics will have more slouch, and I recommend reinforcing them with medium weight fusible interfacing for the best result. The blocked construction of the exterior lends itself to highlighting a special print, or color blocking, or even a quilt square (stay tuned!). There are so many possibilities for customizing this bag. 


Logan Bag Hardware & Supplies

This bag calls for quite a bit of specific hardware and supplies. You can buy all of it at a craft store or online, but to make it as easy as possible to get behind the sewing machine I've put together a kit. The Hardware & Supply kit is one stop shopping for all the bits and pieces necessary to sew a Logan Bag. 

I'll be talking more about the kits later in the week. They are in the shop, and the quantity is limited, so get your Hardware & Supply Kit now!


Logan Bag Pattern Discount
Of course, there is a launch week discount. Use the coupon code LOGAN15 for 15% off the Logan Bag sewing pattern until October 1st. 
Get yours now!

I would love to see where you take this bag (physically  and aesthetically). Share you Logan Bag on Instagram with #wholeclothloganbag & #wholeclothpatterns. And tag me @_wholecloth.


Friday, February 22, 2019

More Sewing to Sell Book Review & Giveaway

The new book More Sewing to Sell by Virginia Lindsay (of Gingercake Patterns) is out and ready to satisfy your maker curiosity about all things handmade business. It's the companion book to Sewing to Sell Virginia wrote a few years ago. Our husbands are college friends and she is one of the few sewists I've known since before I started sewing for the internet. Way back before SweetKM was a thing, I went on a beach trip with Virginia and her family and she told me all about her Etsy pattern business (this was back when you had to manually email the PDF to the customer, remember that!). Less than a year later I started selling my own knitting patterns on Etsy. She was so generous with her experience then, and it makes perfect sense that she should share it in this book series now. 

Virginia is giving away a copy of her book to 5 lucky winners. Be sure to enter the at the bottom of this post!
Every so often I wonder if I should try doing a craft fair, or maybe beef up my Etsy shop. Selling your handmade wares is a logical way to expand your hobby into a small business. I always end up wondering, but what would I make? Virginia's beautiful book has 16 open license patterns that you can use to start or expand your handmade shop offerings (examples are above). They are quick simple designs with lots of of fabric mixing (or not) possibilities to let you match your brand aesthetic. Each pattern gives you guidelines for sewing multiples. 

My favorite part about the book is the interviews with 8 women who run their own handmade businesses. When you're working from home it can sometimes feel isolating and you may be wondering what the heck everyone else is doing behind those glossy websites and pristine instagram feeds. Now you'll know. 
I made the Market Bag from More Sewing to Sell. It's big, boxy and lightweight. I could see using it as a tote bag or stuffing it inside you purse to use when out shopping. I usually throw my wallet into my reusable shopping bag for the walk to the grocery store, and this is certainly an upgrade from that ratty old thing.

I made it totally from stashed fabric in a single evening. The exterior is Robert Kaufman herringbone linen from Fabric.com*.  It looks like they don't make that fabric anymore but the Essex Yarn Dyed Linen would have a similar effect. The interior is a Liberty London fabric I've been hoarding for a few years. I love the soft blue with the purples of the print, and the ribbon closure makes it almost too sweet for any self respecting city girl to carry through urban grit. But I will. My SIL just got an embroidery machine and I'm tempted to send it to her for a quick monogram for the front. 
Because I made it completely from stash supplies I had to change one tiny detail. The original design has an elastic gather at the short ends. I didn't have the right kind of elastic so I adapted it to be a drawstring. I just added two buttonholes in the middle of the short sides, then inserted and sewed ribbed exactly like I would have done the elastic, except that I cut two pieces and the ends are sticking through the buttonholes. It's a small change but I think it's kind of cute and adds a little something to my plain exterior fabric. 

Details:
Bag Pattern: Market Bag from More Sewing to Sell by Virginia Lindsay (Gingercake Patterns)
Bag Fabric Main: Robert Kaufman Herringbone Linen (similar) from Fabric .com*
Bag Fabric Lining: Liberty London from my stash


*Fabric.com links are affiliate links.

More Sewing to Sell GIVEAWAY

Five winners will get a copy of Virginia's new book More Sewing to Sell! U.S winners will receive a physical copy of the book, international winners will receive a digital copy of the book. Visit the other makers on the book tour for more chances to win!

a Rafflecopter giveaway


Thursday, November 9, 2017

Bag Making: New Wholecloth Bento Bag Sewing Pattern


The new 
sewing pattern is now available in the shop! 

***

I'm excited to introduce a pattern that is definitely a tried and true staple in my sewing room! The Wholecloth Bento Bag is a simple design and a very versatile project. The bag is made from a single rectangle of cloth that is folded and sewn into the bento shape. The corners of the opening tie to keep the contents secure. All of the seams are enclosed to make the inside just a lovely as the outside. The pattern includes 4 sizes of bag that you can print on your home printer and assemble. If you'd rather skip the printing you can draft your own with the dimension chart included in the instructions. You can make all 4 sizes in an afternoon with 1 1/2 yards (137cm) of fabric!

I've been making some variation of this bag for years. A bento is my very favorite way to keep my current knitting project in my purse without it getting all jumbled up with the gum wrappers and spare change languishing at the bottom of my bag. Based on the way my family uses our bento bags I've created 4 sizes for the bento pattern. The finished size small is 10in x 11in (25.5cm x 28cm) and just the thing for holding a few small toys in the car. The XL is 17 1/2in x 19in (44.5cm x 48cm) and easily holds a change of clothes for an after school playdate. I use the size large to hold clothespins for laundry day.  My daughter carries her ballet slippers and leotard to class in a size medium.

The interior finish of this design is especially polished. The entire bag is sewn on a standard sewing machine. The illustrated pattern instructions show you how to completely enclose the interior seams for a finish that will stand the test of time and use. 

My favorite fabric for a bento bag is linen because it's durable and wears beautifully.  The solids shown above are Robert Kaufman Essex Linen Blend in yarn dyed black and natural (affiliate). They have the characteristic slump of linen. The top of the stack above is a Maker Maker Lines (affiliate) print for Andover Fabrics. I love all of Sarah's prints, and the linen blend substrate is perfect for a project bag. I picked up the white/natural print (alternate color way) at Gather Here when I was in Boston last week. It is the same Essex Linen Blend substrate, but the ink of the print gives this bag a nice rigidity that keeps the flaps up when it's stuffed with yarn. Any lightweight woven fabric will work for this pattern. I've used a lot of light weight denim in the past, and I picked up an adorable cotton double gauze to make some reusable birthday gift wrap bentos for the kids. 

Actually, my favorite fabric for a bento is whatever scraps I have on hand. Size small only requires a 9in x 25in (23cm x 63.5cm) piece of fabric, making it a great stash buster!

The Wholecloth Bento Bag PDF sewing pattern includes:
-4 bento bag sizes S, M, L, XL complete with notches and seam allowance
- clear step by step illustrated instructions
- PDF pattern to print and assemble at home using your home printer and 8 1/2" x 11" paper 
- pattern dimensions to draft your own pattern pieces rather than print and assemble the PDF

Get yours now!

This morning SweetKM newsletter subscribers got a sweet discount code in their inbox for the Wholecloth Bento Bag. It's not to late for a launch day discount. Sign up for the newsletter and get a 20% discount code for the Wholecloth Bento Bag good until Monday November 13th!

I would love to see what you make! Share your your projects on instagram using #wholeclothprojectbag & #wholeclothpatterns. Tag me @_wholecloth!


SaveSave

Monday, November 21, 2016

Gingercake Patterns Day Off Backpack + GIVEAWAY!

Welcome to the SweetKM stop on the Gingercake Patterns Holiday Gift Sewing Tour! The tour includes 5 weeks, 5 giveaways, and enough handmade gift inspiration to fill up all that space under the Christmas tree. Today I'm sharing the Day Off Backpack from Gingercake Patterns. We have a few other well loved Gingercake projects (Lola Owl Bag, Lola Owl Ornament/Gift Card Holder, Love Your Lunch Box), and I can't wait to add this one to our collection.
I've lost my kid sewing mojo lately, they grow out of everything so fast, and I would rather sew for myself. Making this bag has brought it back in a new way. Handmade bags offer all the fun of playful kid's fabrics and details, but will be useful a whole lot longer!

Scooters are our main mode of transportation around town. Each kid carries their stuff in one of those drawstring backpacks you get for free at fairs. They are great to carry a sweater when the day gets warm, or a water bottle, but if we're out for the whole day the skinny little straps start to get uncomfortable, and aren't up to being filled with a kid's share of the groceries, or splash park gear. I chose this backpack pattern so I could make a more substantial, and versatile pack for the kids to carry all day. The straps of this pack are thick enough that they can even carry their own library books (a huge relief to their bag toting mama!).
The Day Off Backpack pattern comes with adult or child sizes. Both sizes have a snap closure for the main opening, a flap over the opening, and adjustable straps. The adult version has a front zip pocket that could easily be adapted for the kid size.

I made a few small changes to the pattern adding 1" in each direction of the body, and modifying the straps for 1 1/2" hardware (because I couldn't find 1" hardware locally). I used the back piece for the front and the back, and used the top back piece on the front too, to make the casing for the added drawstring.

The fabric is a super cute, orange cat cotton print from Ikea. Most Ikea fabrics are a light weight canvas that is perfect for bags and pouches. Both denims are scraps from other projects. The dark denim has some stretch in one direction. I used a layer of interfacing to stabilize it and used it so the weight of the load was in the non-stretch direction. I modified the shape of the flap to fit a blown up copy of the cat face that I cut out of wool felt and topstitched to plain white canvas. Now that I have a good understanding of the construction I'd like to make a zip top version using the dog print from the upcoming Maker Maker fabric line. (get it...cats and dogs:)

I top stitched the word Meow along the base of the backpack. It was one of the first, impatient things I did, and I wish I had taken the time to get orange thread. I used doubled all purpose thread, but the color doesn't pop enough to do it justice.
L found one of the spare print outs of the cat face that I left in the printer. Based on her reaction she will be thrilled with this backpack, and so am I!

***
Gingercake is offering a different giveaway for each week of the blog tour! Enter below, and keep an eye out for more giveaways.

a Rafflecopter giveaway

Check out the rest of the Gingercake Holiday Blog tour for more great gift ideas!

fabric mutt / made-by-Sara/ sweet KM/ Gingercake/ Jedi Craft Girl/ Sew can she/ LBG studio/ cafenohut/ Welcome to the Mousehouse/ Blue Robin Cottage/ sewpony