Showing posts with label Kids. Show all posts

Monday, January 30, 2017

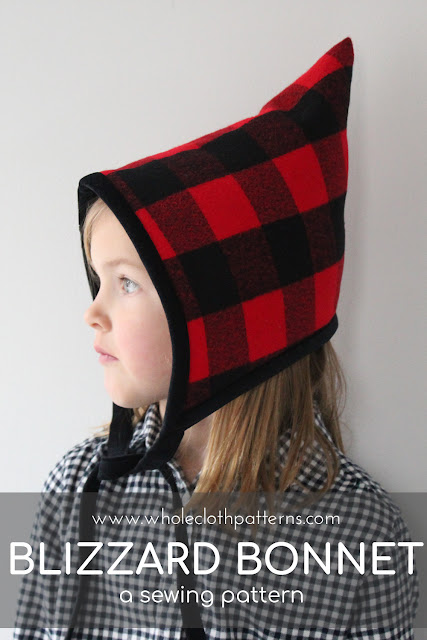
Sewing Pattern: The Blizzard Bonnet A Kid's Pixie Bonnet in 5 sizes

(Updated Dec. 9, 2022) 

I love the classic look of a knit pixie bonnet, and a sewn version seems like the logical next step. My daughter still loves the hat, so I decided to make a Wholecloth Blizzard Bonnet sewing pattern and instructions with expanded sizing from newborn (14in/35.4cm) through child's large (21in/53.5cm).

This design is a very simple, beginner friendly sewing pattern. The woven exterior is lined with warm sherpa fleece, and has a bias bound edge that extends to make strings. It can hang open, or tie at the chin for extra warmth. It's a great way to showcase a favorite print, or use flannel for the lining and create a quilted layer for the exterior. The possibilities are endless.
For my version I used the delightfully warm and soft RK Mammoth Flannel in Red Buffalo Check . The fabric is very thick and is perfect for outerwear, hats, and mittens. I love the classic buffalo check, but there are plenty of other great prints to choose from. I've tried a few different brands of sherpa fleece as I was testing out this pattern. My favorite is the dependably sturdy Michael Miller Organic Sherpa.
I've got a few other knitting and sewing patterns that are just as simple and versatile as this one. If you'd like to be the first to hear about them (and possible testing) sign up for my new newsletter. You'll only get it if something is happening like a sale or new pattern. No spam here!


Share your work!
On Instagram


Join the 

***

FOLLOW ALONG!


SaveSave

Saturday, October 31, 2015

Cowgirl Halloween Costume

I could pretend that I made this costume for L, but as anyone who has ever hand sewn sequins knows...I made this costume for me. When J was 2, I made him the first version of this costume, and it wasn't quite what I had envisioned. I was new to sewing, had never drafted my own anything, and the end result was respectable, but not quite right. I had some unfinished business with the cowboy/girl and I had to finish it this year. 
This vest is a modified Hansel and Gretel Vest. The chaps are self-drafted using a few basic measurements. The button down shirt is a hand me down Theo Button Up from J's outfit in Stylo 3. The boots are from eBay, the jeans from Lands End. 
The belt buckle is layers of wool felt and embroidery. I've never embroidered before (the internet taught me how) and the biggest obstacle was transferring the image. I usually use a window as a light table, but I did this well after bedtime the night before L's school party. I wish there was no shadow of the pencil I traced the image with, but the singer marking pen let me down, and I was too tired to much improvisation.
My kids have never (ever!) had a full sized candy bar, and tonight they each have two. I think that about sums up our trick or treat experience. Philadelphia is a city that is more than happy to chew you  up and spit you out, but somehow Halloween and free candy (and free wine) bring people together!

The skeleton below was made by my mother-in-law 30-ish years ago! It's aged well and J was thrilled to wear Grandmom's creepy costume (which is lucky considering how long it took to sew on all those sequins!). 
Happy Halloween!


***

Vest Pattern: Hansel and Gretel Vest by SweetKM
Main Fabric: Sew Classic Micro Suede from Joann
Accent Fabric: From my stash
Wool Felt: from Felt on the Fly
Chaps Pattern: Self Drafted
Button Down Shirt: Theo Button Up by Zonen 09
Boots: Old West 

Monday, March 2, 2015

Reversible (sort of) Ole with Hood

I used to think I didn't like to make the same thing twice. I was so wrong. I am a process person. Since I restarted sewing last year, I can't seem to make a one off of anything (some of the seconds don't reach the blog). When I finished the first Ole by Zonen 09, I didn't feel finished. Sure that single garment was stitched, labeled and in heavy rotatoion, but I wasn't finished with Ole. 

The Ole pattern has many different options for pockets and collar, and the fabric combinations are endless. This Ole has a hood, side pockets, snap front, and the lining fabric was chosen to wear the inside as the outside sometimes. After faking my way through the construction of the first one, this one is constructed 100% as specified (okay, I cut the cuff as one piece so it would look more like a classic sweatshirt hoodie), with very satisfying results. You may notice the bottom edge of the button band was a little saggy on the my first version. With the second I used Sharon's sew the corner first method, resulting in a much nicer finish. Note to self: you get good results when you read the instructions. 
PATTERN: Ole by Zonen 09. (More pattern review) My last Ole was a cardigan made with two lighter weight knits, but this design works great with sweatshirt fleece. The combination of a heavy main fabric and a jersey lining takes this from a middle layer, to a full on spring jacket. All we need now is warmer weather.

FABRIC: The lining is cotton jersey from Raspberry Creek Fabrics. Love it, would be perfect for spring (if it ever comes) t-shirts, am annoyed I didn't buy more. The shipping is lightning fast, and the customer service is just as speedy. The sweatshirt fleece is from Girl Charlee. I still have trouble (but am getting better) at anticipating the weight of knits purchased via the interweb. Sometimes I'm disappointed when the package arrives and I realize its not right at all for the planned garment. This sweatshirt knit far exceeded my expectations. So buttery soft, it was almost a shame to line. I bought extra, there may be some Mini Hudson's in J's future.

FIT/SIZE: I sewed a 128 Standard (which is an 8, I think). The Zonen 09 cut tends toward long, lean, and modern. I sized up for longer wear, you can see he has some room to grow in the length.
This design is meant to be completely reversible, and I intended to make it that way, until I realized I could't squeeze the sleeves out of stripes. Some heather gray from my stash makes a nice substitution and isn't all bad on the outside.
Ole 1 and Ole 2 planning some sort of bed-headed conspiracy against the camera lady. 


***

Pattern: Ole by Zonen 09
Main Fabric: Sweatshirt Fleece from Girl Charlee
Lining Fabric: Jersey Knit from Raspberry Creek Fabrics

Thursday, February 5, 2015

KCW : Zonen 09 Ole

Kid's Clothes Week Day 4. Day 4!? Where has the week gone? My first (and only) submissions this season are this lovely Ole Cardigan, and Field Trip Raglan. Please accept these submissions and my apologies for over scheduling myself with the winter sessions of every extra curricular activity available in my fair city, greatly diminishing my free time to sew.

Everyone knows I have a bit of a crush on Zonen 09, so I was thrilled to be asked to make an Ole in celebration of the English release of the pattern. I have a bit of experience with Zonen 09 after sewing a couple of Theo button downs in the past. The Ole (like the Theo) is a fairly sophisticated make, it is nicely detailed, infinitely adaptable, and a VERY satisfying sew. Zonen 09 is known for crisp urban boy's wear, but Mina Dotter made her girl version look so appealing, L got first dibs on Ole.
PATTERN: Ole jacket from Zonen 09.  I totally under estimated this pattern when I was fabric shopping (and when I was sewing, more on that later). In my mind it was a cardigan because I planned to make the simplest shawl collar version, but it is so much more. Depending on the weight of the fabric you choose it could be a full on spring jacket, with on seam pockets on the outside and two options for interior pockets. It is fully lined, and can be completely reversible. It can be fastened with buttons or snaps. The Ole is in English, but maintains a few characteristic of it European decent. Seam allowances are not included on the pattern pieces, so I added 1/2" to each piece when I traced them. I know many people add the seam allowances on the fabric, but because I'm not used to doing it that way, I would rather screw up on paper, then forget and screw up my fabric. It is also formatted for A4 printing, making it a skosh too large for American letter size copy paper. I use legal size paper as a substitute for A4.

FABRIC: The exterior is a vintage polyester knit from Crafter Glow. It is medium weight and doesn't have much stretch. The interior is light weight cotton jersey from Girl Charlee. The buttons are vintage from my stash. 

SIZE/FIT: Like the Theo, the Ole comes with two fit options, standard and slim. L measured a 5, but I made the size 6 standard because I wanted it to be roomy enough for more than one layer underneath.  Even the standard fit has a nice long and lean look about it. 

I'm not gonna lie, this pattern kicked my butt. The whole thing seems silly now, but that's the way it is when you're learning new techniques. I read the instructions for attaching the cuff to the lining and the exterior at the same time 1 million times. ONE MILLION!!!! But I just didn't get it. I figured that it was the bagged lining method that I tried with the Salme Cropped Blazer, so I went back to the Grainline tutorial I've used in the past. It worked like a charm, though because I followed the Grainline instructions as exactly as I could, my assembly isn't quite what is specified by Zonen 09, and I had to do a little fudging of the finishing with some top stitching at the end.

When I finished I went back and read the instructions again, and they made perfect sense. If you have bagged more than one jacket lining over a year ago, you'll have no trouble at all. If you have never done it, baste everything as a test run. I ripped those g.d. cuffs off (after serging too!) so many times I very nearly gave up. The point is it's tricky, but not rocket science. The perfect fit and thoughtful details of this jacket are well worth stretching your skills. Next time I'll be bagging linings and attaching collars like a pro. 
Because you can't wear just a cardigan (and it wouldn't be KCW if I didn't sew at least one t-shirt), I whipped up a new Field Trip Raglan to go with it. I've made this pattern many times (here, here, here) before, which makes it easy to alter with a dependable outcome. The sleeves are vintage knit from my stash, and shorted to three quarter length. I added an inch of length to the body, and made the neckline 1/2" bigger for a girlier look. The graphic is from my Conversation Heart Valentine Pins, blown up to t-shirt size and applied with a freezer paper stencil. 


Friday, October 31, 2014

Field Trip Raglan Kitty Cat

My sweet little children are all over the place at Halloween. They change costume choices daily, most  of their choices are virtually unmakeable (a single pink Smartie!?). We barely trick or treat, I hate costumes that are overly specific or that they can't put on themselves to play with later, and I veto any licensed characters. All of this adds a whole lot of complication to costume planning. This year we set two parameters 1. I can make it with a useful clothing pattern 2. it will be an asset to our existing dress up bin. With that in mind today we are exhibiting L's Tippy Cat Costume.

L wants a kitty of her very own vey badly, but mommy just isn't ready. Until I am, she uses Gramma's cat Tippy as a substitute. He gets the first hug hello and the last kiss (for real) goodbye when we're at the farm. Last year she had a Tippy Cat birthday cake, this year she has a Tippy Cat costume.

The costume is the Oliver + S Field Trip Raglan. It is sewn in gray fleece from Joann, and some furry stuff that is so crumby and synthetic on the reverse side that I had to line it with a cotton knit.  I made it a size bigger than normal to accommodate the thicker fleece and the minimal stretch. I added a few inches at the hem, and a waistband so I had a good spot to attach the tail. Of course, I added thumbhole cuffs pawsThe hat is just a fleece square with the corners sewn shut to make the ears, and I used the same mask template to make a kitty face.

Stop by on Monday for J's bat costume (here is a sneak peak), and some exciting news for SweetKM.
Happy Halloween!

Thursday, July 24, 2014

KCW Day 4 : Zonen 09 Theo Button Down


How is it Day 4 of Kid's Clothes Week already? Today's offering took a little more than 1 hour a day to sew, but the late night was totally worth it. I've had my eye on the Zonen 09 Theo button down for a while. Somehow Sharon at Zonen 09 has made the short sleeved woven shirt everybody's dad wore in the 70's (my Dad was partial to plaid) look fresh and modern. Little boys in muted floral prints, the exaggerated collar, and those fetching little triangle pieces, somehow make a trite throwback look positively edgy. Call it aspirational sewing, but I wanted a piece of that action. 

Let's be clear, the Zonen 09 Theo Pattern in only available in Dutch, and I don't speak Dutch. I could have bought a pattern in English and just modified it to suit, but what fun would that be? I'm sewing the Theo in Dutch, just to see if I can.

PATTERN: The Zonen 09 Theo is a basic button down shirt with options for long sleeves, short sleeves, an uber 70's collar, and a standard collar. It also comes in a slim and standard fit. It has instructions for clipped corners scattered through out the shirt, or piping across the back. You also have the choice of 3 pocket details, and welt or sewn buttonholes. I bought this pattern because of the corner details (keep reading) and the beautifully slim fit. It's completely different than the I've-eatten-too-much-micky-D's fit you see in department stores. 

FABRIC: I used Liberty London Tana Lawn Betsy in light blue from Fabric.com. I bought it on sale, so naturally its out of stock now. Liberty London's reputation for sturdy softness will not let you down. I chose this particular print because of its passably masculine floral print.  I'm playing up the blues with some Robert Kaufman chambray for the lining pieces (also used here).
DETAILS: Zonen 09 is a genius with subtle, wearable details for boys. Often I think boy centric pattern designs are a bit costumey, or an awkward translation of what daddy wears. But the simple cut corner detail that is all over (or not, your choice) this button down, is just the right amount of fuss for my taste. You may not notice them the first time, but a second look adds to the depth of the design.  I used the Robert Kaufman indigo chambray for all of the corner clips except the shoulder. J has a not so secret love of pink, so I wanted to add a special little snippet of pink just for him. On the shoulder (top right) I used the hot pink linen from the Clover Capris. The red button is vintage, and a tiny bit too big for my taste, but a perfect button would have required a trip to fabric row with 2 kids in 93 degree heat, when we really just wanted to go to the pool.  I put the collar on backwards the first time. Had it completely sewn in when I realized the clipped corner was on the underside. Uffa! Such a tiny thing, but I had to fix it. It is killing me that I sewed right through the triangle at the hem (bottom left). Knucklehead! I should have sewn around it for consistency sake...must go fix.
FIT: Based solely on measurements J was a 122 Slim, which is the equivalent to a 7 slim. Spot on considering he's 7, and slim. I made a muslin for this shirt to make sure nothing was lost in translation before I cut into the sacred Liberty, and to make sure it fit. The 122S fit perfectly, but I want him to be able to wear this labor of love for a while, so I bumped up to a 128S (8 slim). I love the fit. 

ALTERATIONS: Are you kidding me? Alterations? I'm lucky I got a wearable shirt. I didn't change a thing. I've seen a few little girl dress hacks of this pattern in the Zonen 09 Flickr pool, might try that for L. 

I will definitely make this pattern again. When the KCW smoke clears, I might make another in chambray, and then I'll post my tips for the minimum you need to know to cobble this thing together if you don't speak dutch. 
J is wearing the Sunny Day Shorts from a few weeks ago, where I used the same patch pocket detail.

linking up to KCW here.

***

And the winner of the Gingercake lunch bag pattern giveaway is JUDITH MARTINEZ! Congratulations Judith, watch your email for more details. Thanks to Virginia at Gingercake for sharing her pattern with us and to everyone who entered. Head on over to the Gingercake store and get your lunch bag pattern while they are on sale.

***


Monday, July 21, 2014

#kidsclothesweek

Its started! Kid's Clothes Week has started! Did you know you can follow @kidsclothesweek on instagram? There are tons on examples of works in progress and already some finished pieces gracing the hashtag #kidsclothesweek. You can follow me, and see some of my work in progress, @kristi_sweetkm.
Because I think it does some psychological good to cross something completely off the list early, Im starting out easy. Im carrying over a few concepts from my initial KCW planning. The crazy homemade fabric for one. I made J a pair of Sunny Day shorts a few weeks ago, so I knew these would be a quick, easy, sure fitting sew. Knowing that the fit and construction are under control gives me complete freedom to dream up a few new embellishments. The embellishing makes sewing these simple shorts a lot more fun.


First embellishment is the fabric. This started out as my standard Joann light weight denim that I balled up in no particular way and wrapped with a few rubberbands to hold the shape. Then I bleached it beyond recognition in a large pot of about 2 gallons of water and about 2 cups of bleach. I stirred the toxic mix around so there were no pockets of bleach, then I drowned my ball of cloth in it. The cloth tends to float a little bit out of the water, so I put the lid from a smaller pot on top of the ball and weighed it down with shampoo bottles and forgot about it for 6 hours. Then I rinsed and washed it twice in the washing machine. The balling/rubberbanding turns out to be unnecessary. I tried another piece without, and it still gets the variation from light to dark. I am still looking for a way to get a more uniform color change.

Im also building on the Love YourLunch Box (psst...don't forget to enter the giveaway) sewing from last week (be sure to stop by and enter the pattern giveaway) with a few little patches of topstitching. I went round and round in my head with accent fabric, or little embellishments for these shorts, but in the end decided less (but not nothing, I havent gone completely insane) is more. So I topstitched one side of the front pocket in white lines 3/8 apart. I also worked some pocket magic on the tushie. More white lines of stitching, and a little tab in a triangle of unbleached denim.

I could make 10 more pairs of these shorts and not run out of fun little things to do to them. But, now that Ive evened the score a bit with some little boy sewing, tomorrow Im going to focus on L. Capris perhaps

linking to KCW here.

***


Check out the aforementioned GIVEAWAY of any of Gingercakes lovely and versatile lunch bag patterns. After this week of frantic photo shoots with squirmy kids, sewing a bag (rather than garment) will be a refreshing change!

**