Showing posts with label SewDIY. Show all posts

Tuesday, September 25, 2018

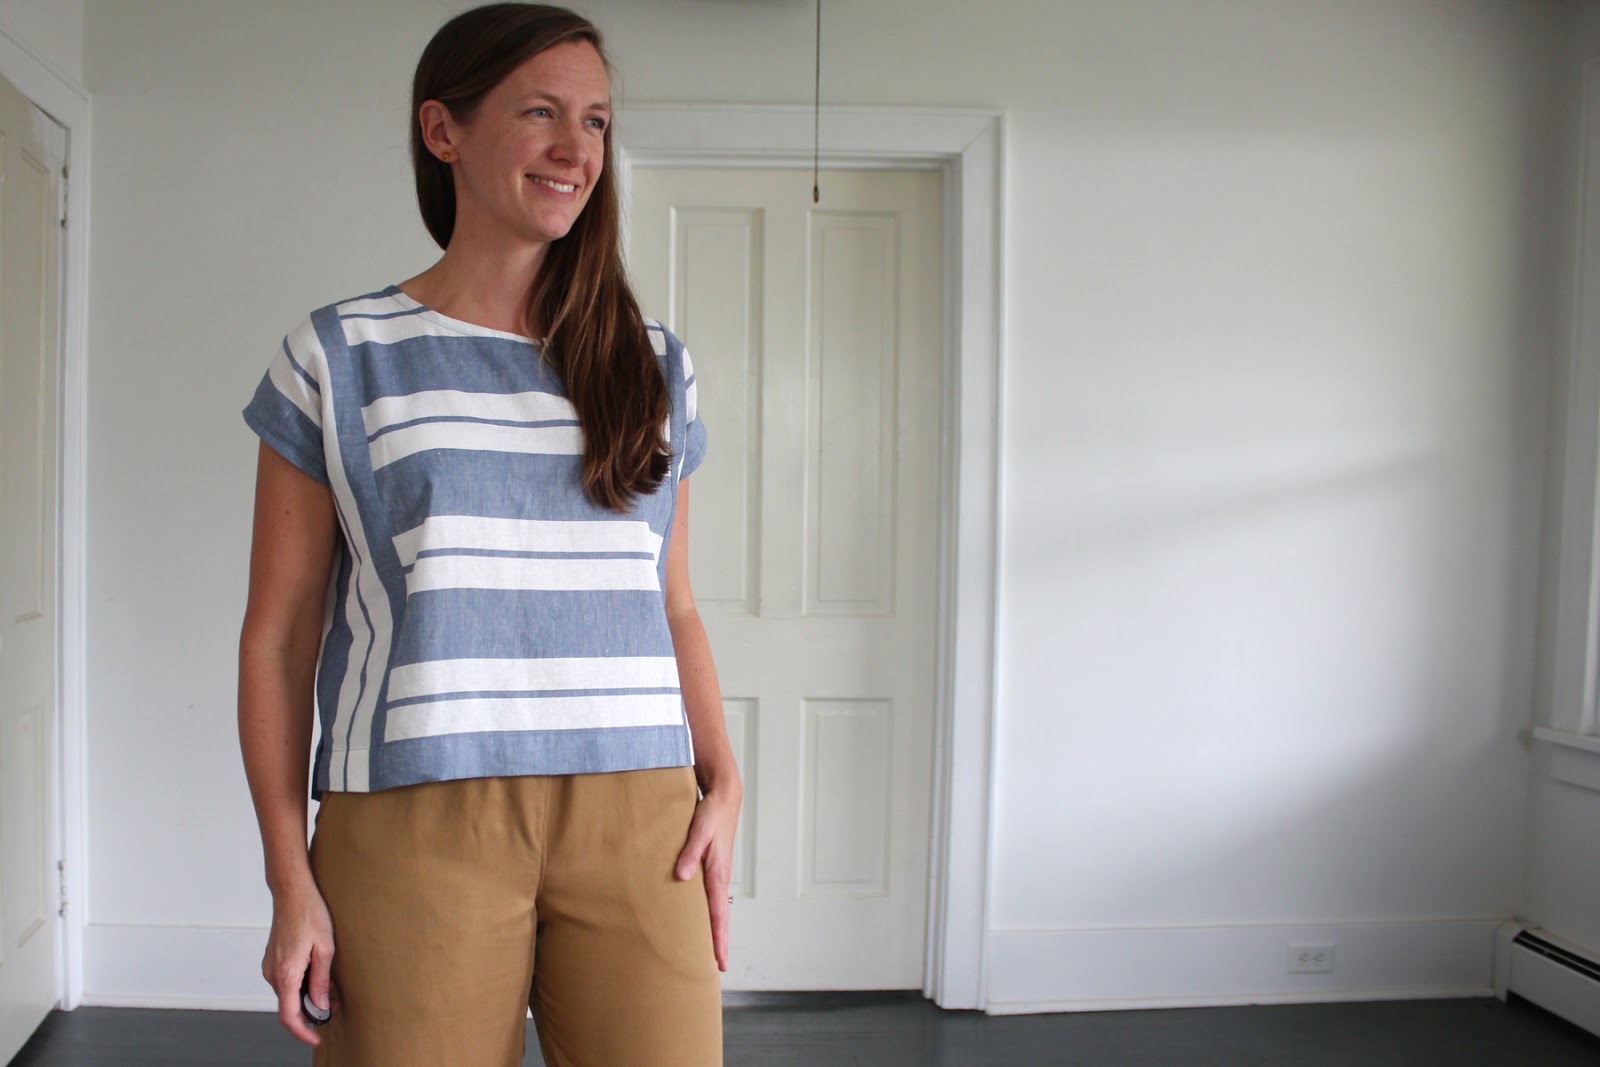
Ladder Stripe Lou Box Top & Wide Leg Pants

Since moving early last summer, I have collected quite a stash of uncut yardage purchased with big plans and the best intentions, but no actual time to sew. (There's no better way to quantify a fabric hoarding problem than to move!) This fall I'm determined to work through that guilty pile with a little something to refresh my fall wardrobe. These are my go-to self-drafted pants, and my very favorite pattern to hack, the Lou Box Top from Sew DIY.
The pants are my standard wide leg pants pattern that I drafted a few years ago. I am so heavily invested in this style (current count - 6), can we all please agree that they will never go out of style?! I used the medium weight Tencel Twill II from Blackbird Fabrics for this version. This Camel color is sold out, but I'm also loving Penny. I wanted something a bit more substantial for fall than my linen versions, but with a drape that doesn't stifle the width. This fabric is so swishy and soft I'm tempted to make a pair in every color!
I saw a top similar to this one somewhere on the internet, and I've had it tucked into a dusty little corner of my brain ever since. The Lou Box Top is basically two pieces, a front and a back. I cut each piece parallel to the center line about 2 inches from the neck opening. Then added a seam allowance to each side of the cut. I cut the outer piece parallel to the grain of the fabric, and the center piece perpendicular to the grain to create this ladder stripe pattern. To make the button back I added 2" to the center back. I used a 1" strip of fusible interfacing 1/2" from the raw edge of the center back pieces for the button placket. Then turned a 1/2" fold, then a 1" fold one each side of the back. Then stitched as close to the fold as I could to sew down the placket. I was torn as to weather I should match the buttons/holes to the stripe pattern but in the end decided that made the buttons either awkwardly close, or awkwardly far apart so I just spaced them 3". You'll find a few images for how-to make the hack at the end of this post. 

The fabric is a yarn dyed cotton linen stripe from Fabric.com*. It's the perfect weight for an unstructured top, but it is a tad see through on the white stripes. I was careful to position a thick blue stripe across my bust line. 

HOW-TO HACK THE LOU BOX TOP
click for larger image


***

Details:
Shirt Pattern: Lou Box Top from Sew DIY
Shirt Fabric: Cotton/Linen Stripe from Fabric.com*
Pants Pattern: Self-drafted Wide Leg Pants
Pants Fabric: Tencel Twill II in Camel from Blackbird Fabrics

*Fabric.com links are affiliate links.


Wednesday, September 12, 2018

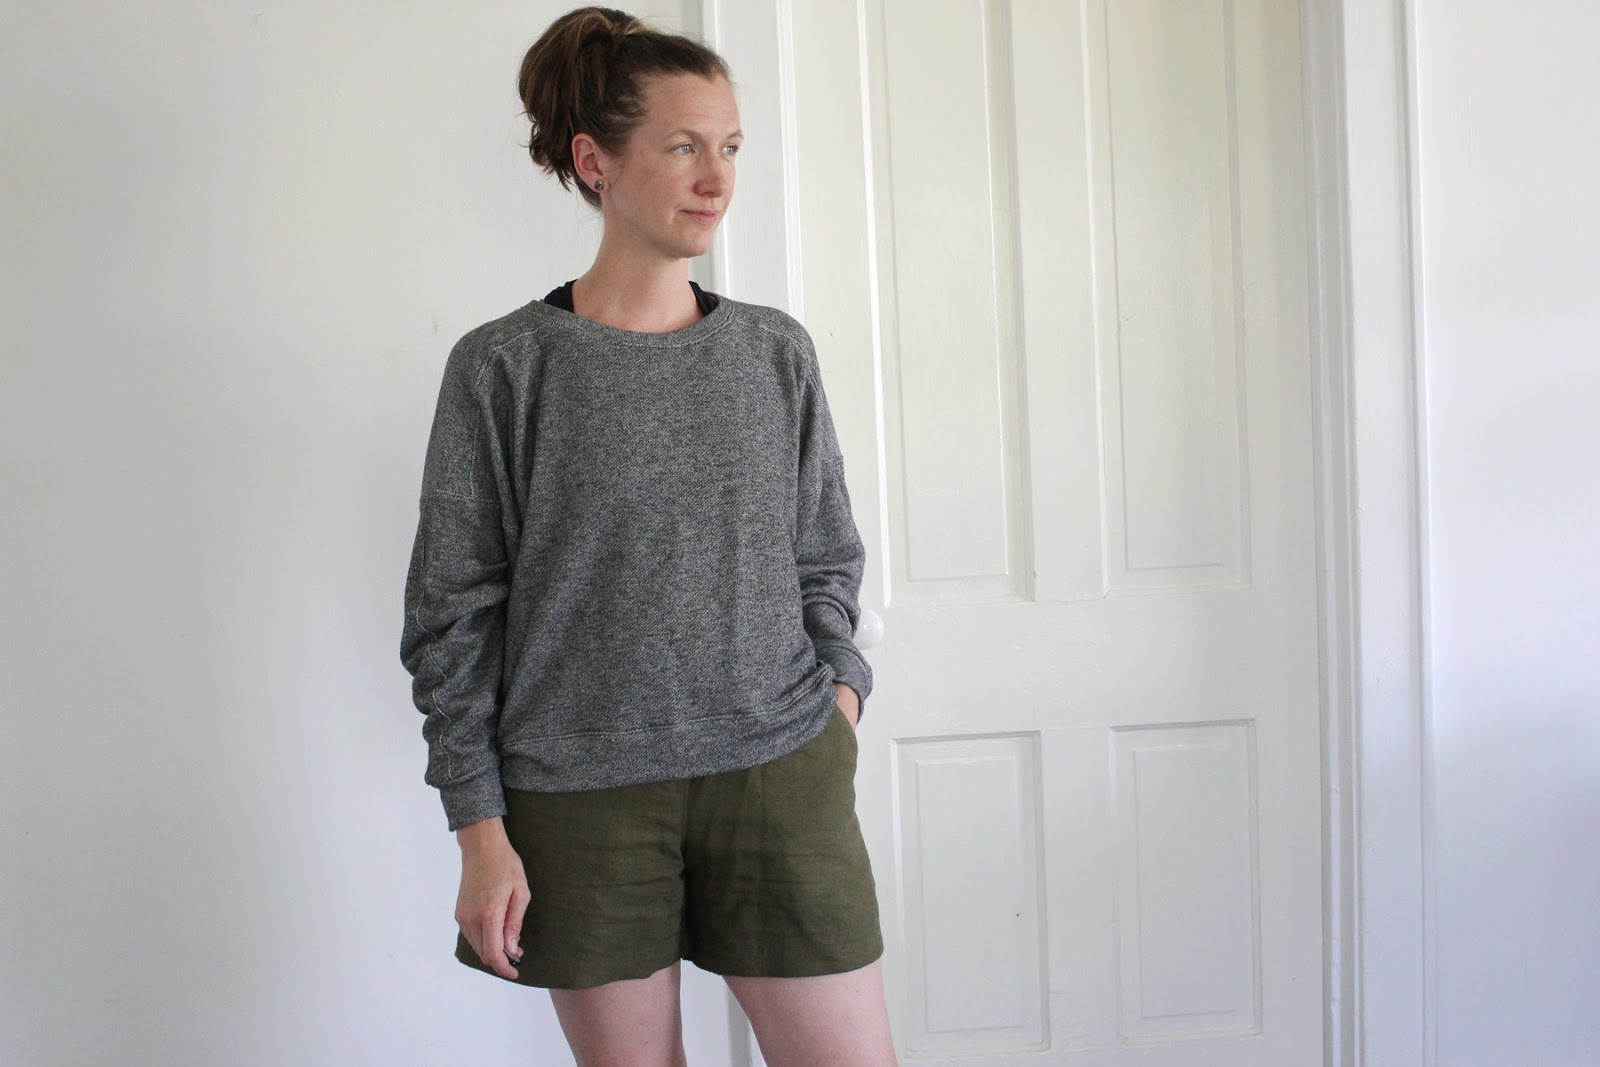
The New Ali Sweatshirt Sewing Pattern From Sew DIY

The new Ali Sweatshirt from Sew DIY is making all my loungewear dreams come true. I'm going through a sewing for comfort phase (or have I always been in one?!), elastic waist paints, loose fitting tees, and now cozy sweatshirts. It was 95 degrees with drenching humidity the day I took these photos (which explains the drastic departure in hair styling), but even in the summer an easy wearing sweatshirt comes in handy. This is a little something to throw into the tote bag for the fireworks, or use as a beach coverup. The sand won't be an issue in a easy washing french terry knit. 

The Ali Sweatshirt construction is a nice little twist on your basic pullover. There is a two piece back yoke that pushes the shoulder seam a bit to the front. Those seam lines along with a two piece sleeve, and drop shoulder add a bit of subtle (my favorite kind) detail to the lines of the top. 
I made this as a pattern tester and I know Beth has tweaked the length since then so I won't get into how I altered mine. I love the exaggerated width and cropped length. I wore the Ali with my self-drafted shorts and Adventure Tanks all through an unusually chilly week in August when I was at my family's farm. Having a simple sweatshirt that I could wear over just about anything made it easy to pack light. 

For the sizing I sewed a medium graded to a large at the hips. Next time I think I could get away with a straight medium since I cropped the length to above my hip (i.e. largest measurement). There is also plenty of ease built into this design. 

The fabric is Telio Splendid french terry* in dark gray, and it is as splendid as its name would have you believe. It's a loose, soft weave, and has a nice bit of drape. I pre-washed it once, but next time I would do it twice. I've worn and washed it a lot and it's shrunk a little more. 

I've probably said it before but I love the layout of SewDIY patterns. There is such a clear hierarchy of information with sizes, labels, and notes each given their proper priority that there's no doubt where or what you're cutting. I hate it when you tape up a pattern and everything reads the same. They are the opposite of those Japanese pattern books where all the patterns are printed on top of each other giving me a headsplosion!

Pattern: Ali Sweatshirt from Sew DIY
Fabric: Telio Splendid French Terry in Dark Gray from Fabric.com*
Shorts: Self-Drafted

*Fabric.com links are affiliate links. The opinions are my own. 
I received this pattern for free as a tester for Sew DIY. The opinions are my own. 

Tuesday, August 15, 2017

Lou Box Top as Dress

For the last little while I have been chasing the perfect sack dress. A dress that can hit the moving target of what to wear today, without too much thought. Something that works for mothering, and satisfies my need to be a little bit pretty. A phantom most-basic dress, in a most-basic black.  This solid attempt to check all those boxes is a Sew DIY Lou Box Top modified into a dress with cuffed sleeves. I made a few rough drafts (one here) to experiment with key elements such as the ideal hem length, a neckline that just grazes the collar bone, and a fabric interesting enough to act as the only detail across a large blank rectangle. 
Part of the beauty of a simple dress is its versatility. Shoes, and jewelry (or total lack of it) can make very different looks. I've styled my dress two ways, whose dramatic difference is possibly only noticeable to me!

This fabric is Tencel Linen from Joann. I carry a running list of things I want to make in my head, and sometimes when my hand hits upon a particularly nice fabric, one item on the list jumps to the front of the line. The drape and subtle texture of this fabric compliment the pure geometry of the dress.

The material is substantial enough to be a bottom weight, and would make great wide leg pants, or billowing shorts. The only downside is its ability to carve the wearer's movements in permanent relief across the front. By that I mean, it wrinkles easily. There is a crease down the front where I cut the front pattern piece on the fold (no iron, just pins). I've steamed, and ironed, but it won't budge. I'm afraid Photoshop is the only way to fix it! Maybe the evidence of wear will add to the character of the fabric (that's what I'm telling myself :).
MODIFICATIONS: Narrow hipped ladies can probably sew the same size dress, as they would for a top. Ladies with a bootie (ahem, me) should choose their size based on the hip measurement, rather than bust. I compared the width of the Lou Box Top sizes to the width of a few of my other woven dresses, and chose a similar size.

The Lou Box pattern is drafted with different hem options that are separate pieces. The top shirt piece has a straight seam along the lower edge that I extended to just above the knee length.

I tweaked the neck curve a bit based on previous versions. My neck opening is big enough that I didn't need to use a button back neck opening, but I cut the back as two pieces anyway. The seam gives a more structure to the shape, and counteracts the tendency my full back version has of sticking to my butt. There are other sway back shaping tricks that would achieve the same goal, but I wanted to keep it as simple as possible.

Inspired by the many sack tops and dresses floating around the sustainable fashion inter web (here, here, here) I wanted to add cuffs to my dress. I like the addition of the clean detail to a very plain dress. Accentuating the shoulders, also gives visual balance to my pear shape.

HOW-TO ADD CUFFS to the Lou Box Top:
To add the cuffs cut a pattern piece based on the dimensions in the image above. This creates a 1 1/2" cuff. The long dimension will vary depending on the size you are sewing. With right sides together, sew the short edges with a 1/2" seam allowance. Press seam open. Fold the loop in half with wrong sides together, and press. Then make a 1/2" fold along one raw edge of the loop and press. With right sides together align the other raw edge of the loop with the arm opening, aligning the cuff seam with the side seam of the dress. Sew with 1/2" seam allowance. Press the cuff and seam allowance away from the body of the dress. Using the creases made earlier, fold the cuff in half toward the wrong side of the garment. Pin the smaller fold just over the previous seam line with the seam allowance sandwiched between. Pin. With right side up top stitch as close to the seam line as you feel comfortable (I stitched in the ditch). Be sure you are catching the inside edge of the cuff as you go.


***

Dress Pattern: Modified Lou Box Top by Sew DIY
Dress Fabric: Nicole Miller Solid Linen Blend from Joann Fabrics
Necklace: Tutorial Here
Bracelet: Wrist Ruler from Tolt Yarn & Wool


SaveSaveSaveSaveSaveSave
SaveSaveSaveSaveSaveSaveSaveSaveSaveSaveSaveSave

Wednesday, October 19, 2016

Fall Layers - Lou Box Top Dress

This fall I've been trying to think more about how the things I knit, and sew fit into my wardrobe as a whole. These thoughts are the natural progression from one who sews to learn skills, so focused on a welt pocket or hidden zipper that the garment itself hardly matters, to one who sews to build a wardrobe, and has the luxury of taking a step back for a better view of the big picture. My frame of mind is also influenced by the general feelings in the maker community embodied in Slow Fashion October. Simple as this dress is, it is a step toward a handmade wardrobe that will last a long time. I'm also influenced by the indie fashion community and its current penchant for capsule wardrobes, sustainably made clothing, and minimalist closets. 

All that to say that when I made my fall and winter sewing plans, I thought of the individual garments as a flexible collection of versatile layers. When these pieces are pared with the things I have in my current closet rotation they will make a more versatile wardrobe. Nothing that will stop traffic, but it makes me feel good. This dress in particular makes me feel very good. It is effortless to throw on, and when I get tired of its simplicity (could that ever happen?!) I can layer it up to add interest. It is a modified Lou Box Top that I am calling Layer #1.
If you're questioning the need for such a simple pattern, take heart, I have sewn the Lou Box Top from Sew DIY at least 5 times. It's a useful and dependable starting point for making all your unstructured top dreams come true. You could also use the Blanc Tee from Blank Slate Patterns (affiliate link), or Mariella Walker's Maya Dress/Top. I was uncertain about how I would look in such a shapeless dress, but after a little research (including the Sew Bon Lou Box dress, Erin's Maxi version, and a rayon tunic I tried on at Target) I determined that the key to a successful sack dress is the fabric. The right one would have a bit of body, and nice drape so my shape isn't completely overwhelmed. For Layer #1 I wanted something in the tan family so it could go with denim and black, and short sleeved so I can wear it in the summer too. I wanted a goldilocks length that could be worn as a dress bare legged, or with the skinniest of jeans as a tunic. 

This rayon modal (so said the bolt) is from Joann Fabric. When I found it I wanted to scream and jump up and down a la someone who just found Chanel at the thrift store. I would call this fabric medium weight, it's heavier and more opaque than rayon challis. It has a beautiful drape, and a subtle chambray-like variation in the color from beige to white. The cherry on top of this delicious sundae is that is gets a uniform crinkle texture after it is washed and dried! The lady at the cutting table was determined not to share in my ecstasy, and kept tut-tuting about how tricky is would be to cut. It was actually pretty easy to cut, and sew. I went back for more a week later and couldn't find it, also can't find it online. It was in the denim section, and worth a thorough search if you're headed to Joann. I promise to be a very good girl this year if Santa would only bring me this fabric in a light washed denim blue, and a dark olive green. 
The rayon is easy to cut and sew, but frayed like a son of a gun. I like the level of interior finish to be reciprocal to the complexity of construction. This top is the simplest construction around, so the finishes had to be top notch. Most of the body seams are clean finish seams top stitched to the body of the garment, and the side seams are french.  I added 1 1/2" cuffs to each sleeve, changed the neck opening, and used a subtle hi/lo hem. That's the beauty of a simple pattern,
I've got some more substantial layers planned to go with this little dress, but in the mean time I'll wear it with this me-made scarf. I'm sharing the scarf tutorial on Petit a Petit and Family today.  It's a very versatile scarf, and very easy to make. Go check it out!


***
Details:
Dress Pattern: Lou Box Top by Sew DIY
Dress Fabric: Rayon Modal (item #400152176316 not currently online) from Joann Fabric
Boots: Petty Ankle Bootie by Sam Edelman
Scarf Pattern: SweetKM Tutorial on Petit a Petit


FOLLOW ALONG!


SaveSave
SaveSaveSaveSave
SaveSave
SaveSave

Monday, July 20, 2015

Lou Box Dress

This cinched at the waist silhouette is one I wear often. I had my eye on a dress sort of like this from Gap. I even considered going to the mall to try it on, but I would rather dance naked in the street than go shopping. Then I considered ordering online, which would require multiple sizes just to be safe, resulting in a trip to the mall so I could return the one that doesn't fit, which brings us back to dancing naked.  I decided to save myself some grief and do that dress one better with some jean-esque topstitching, a pieced bias binding, and an open back.
PATTERN: Lou Box Top by Sew DIY with an altered back and self-drafted skirt. I used the upper piece of the Lou Box Top pattern for the bodice (this pattern has several hem variations and the top and hem are separate pattern pieces that you connect to make a specific variation), adding 1/2" of length and 1/2" of seam allowance (1" total). I pushed the neck opening toward the shoulder 1/2" at each shoulder seam, and curved the new point into the original center front. The back center opening makes a V down the center back seam.

The skirt is cut as a separate piece. At the waist it is the same width as the bottom of the bodice (obviously), then it flares slightly to the hip, then is straight from hip to hem. There is a 5" slit up the back, and a 2" hem. The waist seam is straight, next time I could curve them slightly so the blousiness of the middle is the same as the sides. I would also add pockets. Pockets Kristi! No dress is ever finished without pockets! I got so engrossed in just the right seam finishing that I completely forgot to put in pockets. Next time...

I wanted to finish this dress with similar topstitching to the chambray top I made with the same pattern.   I decided to limit myself to topstitching the shoulder seam, and the back center seam, that then goes in a continuous loop around the neck opening. It took a bit of fussing to get the topstitching just right, especially at the turn, and I though long and hard about the order of assembling the pieces to achieve the look

FABRIC: Light Weight Denim from Joann Fabric. This fabric is a great bang for your buck, I use it a lot for the first attempt at new patterns. It is 57" wide and I used 4'. My soon-to-be-signature pieced bias binding is made with scraps of cotton stripe, and Liberty London Betsy A Tana Lawn.
I love the Lou Box Top. I hate to admit that I was very skeptical about the minimal shaping when I first laid eyes on the pattern pieces, but I was so foolishly wrong. I have made four (left to right): this dress, a knit version I never blogged, a chambray version, and a broken stripe version. The chambray version I made as a pattern tester is by far my most worn handmade garment. This pattern looks great on everyone. I love this variation with a contrasting pocket, or this one with Nani Iro blocking at the top, or Lauren's layered look. Its very simple to make, easy to wear, and a breeze bend to your will.


***

Pertinent Info:
PATTERN: Lou Box Top by Sew DIY
FABRIC:Light Weight Denim from Joann Fabric


Monday, May 18, 2015

Broken Stripe Box Top

I made this top over a month ago, but couldn't be bothered to brush my hair and stand in front of a camera for such a simple shirt. While sorting through Me-Made-May photos (you can see mine on instagram) I realized I had enough shots from the last time I wore it for a modest blog post (as if anything this selfie ridden could be considered modest).

This is the Lou Box Top from Sew DIY (made perviously HERE). I love this pattern because it's easy wearing and infinitely versatile. For this version I lengthened the whole thing by 1", and made the neckline 1/4" bigger (or was it 1/2") all the way round.
The fabric is a some what scratchy linen from Joann. I wasn't really sure this fabric was my thing, but it was blue, and a natural fiber, so I bought it anyway. I only bought a yard, because I wasn't really sure it was my thing. Normally, a yard is enough for a Box Top, and a flag to wave beside. While at the cutting table I failed to consider that the stripes should match at the shoulder seam, and it is an awfully large repeat. I didn't have enough fabric. My solution was to make the bottom part of the back as long as possible, then make up the rest with a perpendicular stripe across the shoulder. To celebrate my mistake (and hopefully make it seem intentional) I let the back opening be as long as the upper panel.
The whole thing is french seamed. If you're not familiar with this finish, a simply constructed top is the perfect place to learn. You can get some tips for french seaming the Lou Box Top on the Sew DIY Blog.

As with all Box Tops I wear this a ton. So much that I didn't feel the need to share it the first time I wore it in May, knowing I would wear it again (and again, and again), probably with the exact same favorite skinny jeans. Coincidently, the bottom of the back opening is as long as it can possibly be without showing my bra strap, which leads me to my 4th variation on the Lou Box Top...

***
Pertinent Info:
Pattern: Lou Box Top from SewDIY
Fabric: Linen Stripe (not on website) from Joann Fabrics